Grow Your Own Sweet Potato Slips

Did you know sweet potatoes aren’t grown from seeds? Instead, they are started from root sprouts that slowly emerge from the “eyes” of mature sweet potatoes until they are ready to take over your garden bed with their vines and tuberous roots! This might sound like the plot to a new sci-fi show, but it is actually a science fact that can be observed in your own kitchen or classroom. These sprouts are referred to as slips, and you can grow your own to transplant in the garden using only a few simple materials.
There are a couple of methods for starting slips that work well, including the traditional water method, but below we will talk about a faster method using soil. You will begin growing your slips 8-12 weeks before the date you plan to transplant them outside. Here is St. Louis we would plant them around mid-May.
Grow Your Own Sweet Potato Slips Using Soil
- Gather some mature sweet potatoes. We recommend using potatoes left over from last year’s harvest or organic store-bought sweet potatoes, as most conventional potatoes are treated to prevent slips from growing.
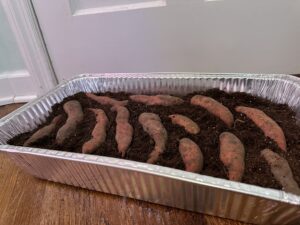
- Find a wide pot with drainage holes or use an aluminum tray and poke some drainage holes in the bottom of the tray. Position your pot or tray in a warm, sunny spot (or use direct artificial light). Make sure you have the tray or pot on top of a lid, rack, or drainage saucer to catch excess water.
- Fill your tray with about 1.5 inches of soil or enough to cover potatoes halfway. You can also use sand for this since the potatoes won’t be using any of the nutrients in the substrate that you use. All of the energy used will come from the potatoes. Place potatoes horizontally into the soil, so that the bottom half is covered in soil, and the top half is exposed to air and light. Be sure to keep the soil moist during the growing process. Adding a heat mat can also be beneficial since sweet potatoes need warmth to grow. Be sure to use one that is specifically for seedlings.
- Once you have several sprouts that are about 6 inches long, you can remove them from the potato by gently twisting or cutting at the base of the sprout. Then place the slips in a glass of water in a sunny spot so that they can form roots. You may want to remove the lower set of leaves on the slips before placing them in water. Be sure to keep the water level below the lowest existing set of leaves and change it every few days so that it does not become anaerobic.
- Once your slips have established a nice set of roots (several inches long), they can be transplanted into a jar of water or planted in a pot of soil until you are ready to move them to the garden!